Scan DVB-S Channels
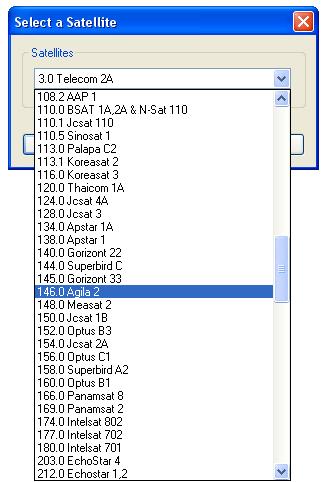
1. Choose Satellite :
If a DVB-S tuner installed on your PC, when first launch BlazeVideo HDTV Player, or when you click
"Add" button in the scan dialog box, below dialog box will popup for you to choose satellite. Please select your desired satellite according to antenna's orientation, then click
"OK" button.
2.Set LNB:
After you choose a satellite for the first time setup, or when you click "Setup" button in the Scan box, below dialog box will popup:
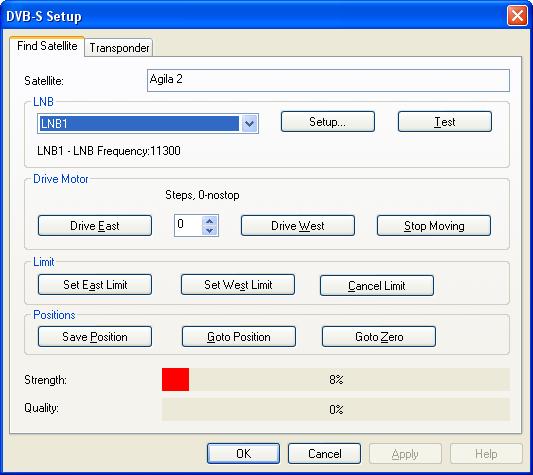
Click "Setup" button to popup below dialog box
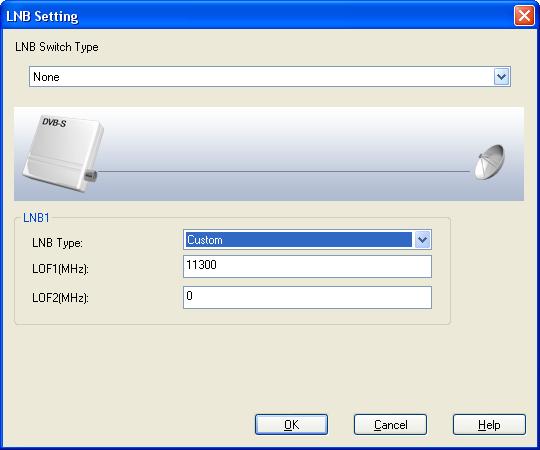
- There are 4 types LNB which can be identified according to the label.
- Ku-L Band
LOF1: 9750MHz
LOF2: 10600MHz
- Ku-C Band
LOF1: 10750MHz
LOF2: 0MHz
- C Band
LOF1: 5150MHz
LOF2: 0MHz
- Custom
LOF1: 11300MHz(default)
LOF2: 0MHz(default)
- LNB Switch Type: drop-down to choose one LNB if there are not only one LNB. Users can set frequency of the selected LNB. There are 4 setting modes
- Default set as None, only one LNB, unnecessary to choose;
- 22KHz, to switch between 2 LNBs;
- Mini DISEqC (Mini DiSEqC or Simple DiSEqC), power consumption less than 22KHz, to switch between 2 LNBs;
- DiSEqC 1.0/2.0, to switch among 4 LNBs.
 Note: Please set the right LNB frequency, otherwise you will fail to receive the satellite signal. If only one LNB, please keep the dafault value.
3. Set Transponder
Frequency of each Transponder is relative fixed. You can access each Transponder information on the relative satellite operator's website. There are some satellites' transponder in BlazeVideo HDTV Player, but the validity and integrality may be uncertain. Below is the Transponder setting box:

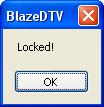
- Test : Test the selected transponder. If locked successfully, below dialog box will popup. Signal strength and quality will also be displayed in green color with the percent number.
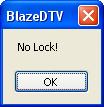
If the transponder is not locked, below dialog box will popup. Signal strength and quality will be displayed in red color.
- New: add transponder. click "New" button, type Frequency, Symbol Rate, Polarity and FEC. All of these parameters can be accessed in the relative website.
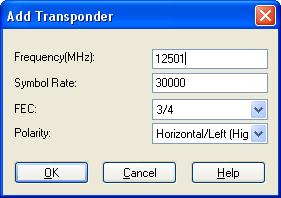
- Edit: Edit the selected transponder, click to popup above dialog box for you to modify the parameter.
- Delete: Delete the selected transponder.
4. Search Satellite and Drive Motor
Before scanning channels, please make sure the satellite antenna has rightly aimed at the target satellite. The installation of polar axis supporting DiSEqC 1.2 or higher on satellite antenna is necessary, and only when the satellite supports the command DiSEqC 1.2 or higher, you can drive the motor of antenna. You can only drive the orientation angle, the polarity angle and elevation angle should be manually adjusted.
Note: Please see the relative document for the operation details of how to rightly aim antenna to satellite.
Please see below how to drive motor:
- Drive East - drive antenna to east with the preset Step value, "0" means continuously drive to east.
- Drive West - drive antenna to west with the preset Step value, "0" means continuously drive to west.
- Set East Limit - set the east limit value, if motor drives to the limit value, it will auto stop driving.
- Set West Limit - Similar as "Set East Limit".
- Save Position - Save present position of the antenna.
- Goto Position - Go to last saved position of the antenna.
- Cancel Limit - Cancel east limit and west limit.
- Goto Zero - Drive antenna to zero position.
5. Scan Channel
After you aim at the target satellite and set the right LNB and frequecny, you will begin to scan channel. The scan box is as below:
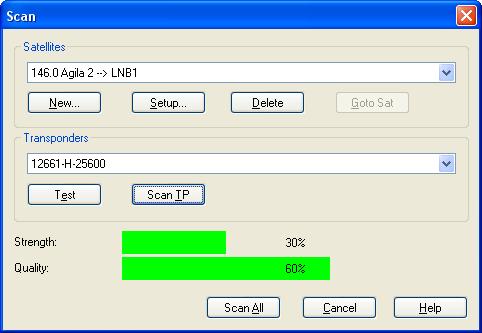 Satellite tab:
 show the binding relationship of LNB and satellite. A LNB can be binded with several satellites, but the antenna position of each satellite should be saved, thus the antenna will be rotated to the relative satellite positon when switch channel between different satellites.
- New: add binding relationship of LNB and satellite, click to popup dialog box to add satellite.
- Setup: set LNB and transponder, to popup dialog box of searching satellite and transponder.
- Delete: delete binding relationship of LNB and satellite. The added or modified transponder info will also be deleted.
- Goto Sat: rotate antenna to the selected satellite. The satellite position should be saved in advance, otherwise this feature will be inactive.
Transponder tab: show all transponders supported by present LNB.
- Test: test signal of the selected transponder. click to popup box showing locked or unlocked. Signal Strength and Quality will also be shown with percent number. green color for locked, red color for unlocked.
- Scan TP: scan the channels of selected Transponder.
- Scan All: scan channels of all Transponder in satellite.
Below dialog box will popup while scanning channels, all scanned channels will be added into channel list after finishing scanning.